

Car A/C System Diagnosis and Air Conditioning Service Guide
This article is also available in video format at the bottom of the page.
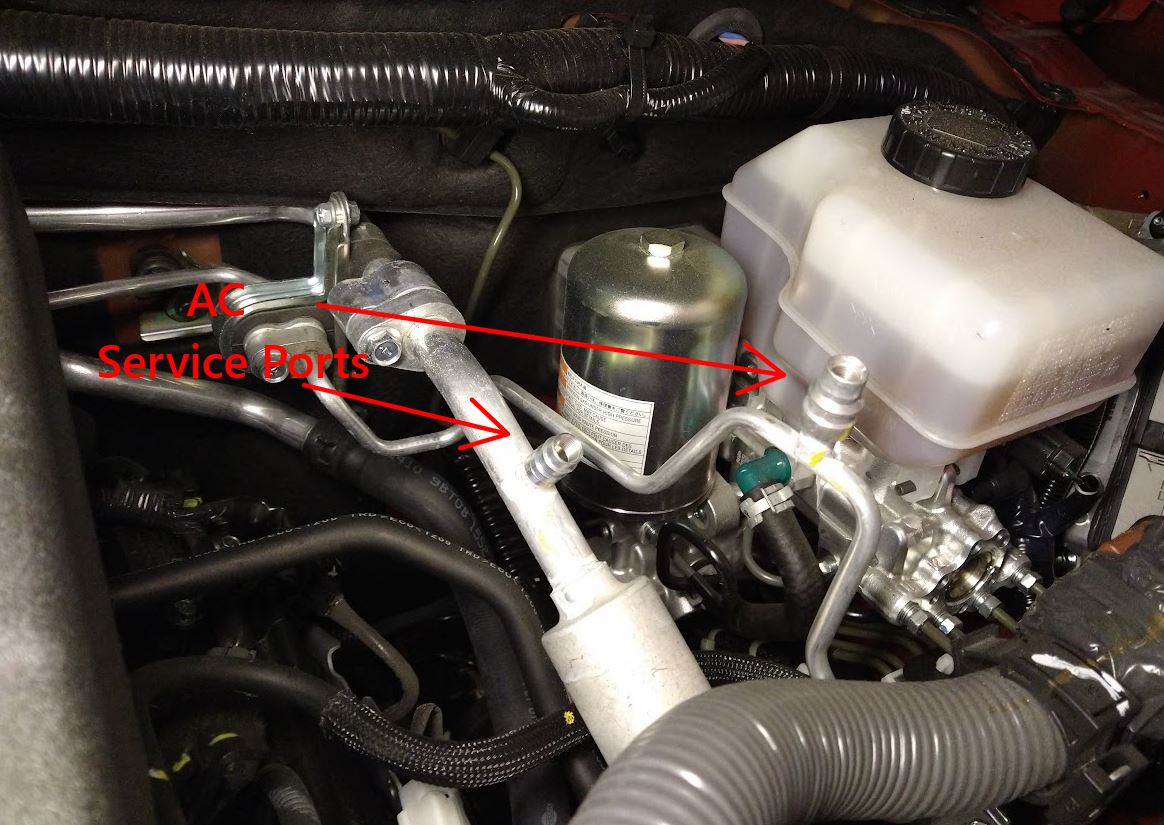
Car manufacturers started using R134A refrigerant in 1995. Vehicles manufactured before this year typically used R12 refrigerant. However, many of these older systems were converted to R134A because R12 production was halted. R12 systems have threaded service ports. R134A systems can be identified by their quick-connect service port connectors, which differ in size for the low and high sides to prevent incorrect connections. The low side connector is smaller than the high side connector.
Refrigerant R1234yf is the newest refrigerant designed to replace R134A due to its lower global warming potential (GWP). R1234yf, compared to R134A, is significantly more environmentally friendly. Service ports on R1234yf systems are quick disconnect similar to R134A; however, they are different sizes to help prevent cross-contamination. As of 2021, newly manufactured light-duty vehicles in the United States no longer use R134A.
Regardless of the type of refrigerant a system uses, the fundamental principles of diagnosing and servicing remain the same. Keep in mind that the appropriate AC gauge sets with compatible connection fittings are essential for servicing the specific system.
Hooking Up AC Gauges - Required Tools
- AC Manifold Gauge Set
- Refrigerant Source (small can for DIY or 30-pound tank for shops)
- Refrigerant Scale (for shops)
- Vacuum Pump (for evacuation)
Color Coding of Hoses
- Blue: Low side (smaller connector)
- Red: High side (larger connector)
- Yellow: Vacuum pump or refrigerant source
Steps to Connect AC Gauges
- Clean Service Ports: Ensure that both low and high side service ports are clean.
- Close Manifold Valves: Make sure both valves on the manifold gauge set are closed by turning them all the way to the right.
- Connect Blue Hose: Attach the blue adapter to the low side service port.
- Connect Red Hose: Attach the red adapter to the high side service port.
- Start the Engine: Turn the engine on. Set the AC to MAX or Recirculate mode with the fan speed on HIGH.
- Read Gauge Pressures: Take note of the low and high side readings.
Basic Refrigerant Charging Instructions
- Close Manifold Valves: Ensure both valves on the manifold are fully closed.
- Prepare Refrigerant Source: Start the car and turn on the AC system.
- Connect Yellow Hose: Attach the yellow hose to the refrigerant can tap or tank. Follow the refrigerant manufacturer’s instructions for dispensing.
- Open Low Side Valve: Slowly open the low side (blue) valve to begin charging. Do not exceed 40 psi to avoid damaging the compressor.
- Complete Charging: Once charging is complete, close the low side (blue) valve.
Evacuating the System Using a Vacuum Pump
- Connect Gauge Set: Attach the gauge set to the car’s AC system.
- Check Refrigerant Levels: Ensure there is no refrigerant in the system. If necessary, have a repair shop recover any remaining refrigerant.
- Attach Vacuum Pump: Connect the yellow hose to the vacuum pump and turn it on.
- Open Manifold Valves: Open both the low and high side valves on the manifold.
- Evacuate System: Run the vacuum pump until a gauge reading of 29" Hg (inches of vacuum) is reached. Continue running the pump for 20 minutes. In some cases, running the vacuum pump for a longer duration can be beneficial to remove excess moisture, particularly if the car's AC system has been open to the atmosphere for an extended period, has experienced a refrigerant leak, or has been subjected to high humidity conditions.
- Close Manifold Valves: After evacuation, close both manifold valves.
- Check for Leaks: Wait for at least two minutes. If the vacuum reading drops, there may be a leak in the system.
Safety Precautions
- Protective Gear: Always wear safety glasses and gloves when working with refrigerants.
- Proper Ventilation: Ensure you are working in a well-ventilated area to avoid inhaling refrigerant fumes.
- Handling Refrigerants: Avoid direct contact with refrigerants, as they can cause frostbite.
Identifying and Addressing Common Issues
- Incorrect Readings: If the gauge readings do not fall within the expected range, there could be a problem with the AC system. Possible issues include a refrigerant leak, a faulty compressor, or a clogged or stuck expansion valve.
- Leaks: If a leak is suspected (like if the vacuum reading does not hold), use a leak detector or soapy water to find and repair the leak before recharging the system fully.
- Water Leaking onto the Floorboard: This indicates a clogged evaporator drain. Locate the drain tube on the firewall and clean it by removing the tube, if possible, and rinsing it out with a water hose. If the tube is not easily removable, a metal hanger can be used to clear the clog. Take care not to insert the hanger too far to avoid damaging the evaporator.
AC Gauge Readings Explained
Low Side Readings (Blue Gauge)
- Normal Range: Typically between 25-45 psi with the AC set to Max/Recirculate and the fan speed on high. Ensure the engine RPM is around 800-1,000 when taking readings.
- High Readings: Could indicate an overcharged system, a restriction in the system, or a malfunctioning expansion valve.
- Low Readings: Could indicate a low refrigerant level, a leak, or a faulty compressor.
High Side Readings (Red Gauge)
- Normal Range: Typically between 200-350 psi with the AC on high.
- High Readings: Could indicate an overcharged system, poor airflow over the condenser, or a restriction in the system.
- Low Readings: Could indicate a low refrigerant level, a faulty compressor, or an expansion valve stuck open.

Maintaining Your AC System
Regular Checks
- Inspect Components: Regularly inspect the AC system components, including the compressor, condenser, evaporator, and hoses, for signs of leaks. Note that some systems use dye to help detect leaks, while others do not. An oily residue is a clear indication of a refrigerant leak.
- Check Refrigerant Levels: Periodically check refrigerant levels and top off as necessary to ensure optimal performance.
- Clean System: Ensure the condenser and evaporator are clean to maintain proper airflow and heat exchange. Dirty cabin air filters can restrict airflow and impact system performance. Additionally, excessive buildup of bugs or dirt on the condenser can also restrict airflow.
Advanced Diagnostics
If you experience persistent issues with your AC system, consider having a professional perform advanced diagnostics to pinpoint the problem.
By following these guidelines and regularly maintaining your car's AC system, you can help ensure it operates efficiently and effectively, providing you with cool air when you need it most. Additionally, if you need AC tools or regular mechanic tools, consider Wise Auto Tools for your needs.
Recent Posts
-

Pentastar 3.6L Head Bolt Thread Repair on a Budget
We recently received a great question from Michael, a DIYer facing a common problem of stripped thre …19th Mar 2025 -

Save A Thread Blown Out! Larger Thread Repair Needed
When a Save-A-Thread insert fails, it can leave the spark plug hole in your engine significantly lar …8th Jan 2025 -

Why a Time Sert kit is needed to install inserts
Years ago, I wrote about a customer who only wanted the tap from a TIME-SERT 2200 kit. More recently …18th Dec 2024