CTA MANUFACTURING CORP
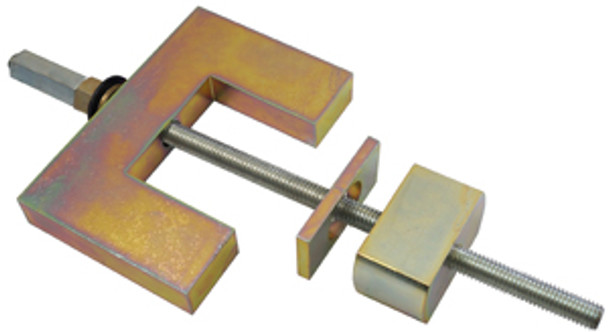
CM7642 BMW Trailing Arm Bushing Removal & Installation Tool
- SKU:
- CM7642
- MPN:
- 7642
- Condition:
- New
- Availability:
- In Stock
- Weight:
- 1.25 LBS
- Shipping:
- Calculated at Checkout
Description
For E36 & E46 (3 Series only)
Drive End: 16mm Hex
This tool will not service some E36 with newer bushing style.
Threaded rod details:
Length: 12"
Diameter: 13/32" (41.25") or 10.48mm
TPI: 14
Description
Application Details
Make Model Year Code
BMW 318i 1992-1999 E36
BMW 318ic 1992-1999 E36
BMW 318is 1992-1999 E36
BMW 320i 1999-2005 E46
BMW 323Ci 1999-2005 E46
BMW 323i 1999-2005 E46
BMW 323ic 1992-1999 E36
BMW 323is 1992-1999 E36
BMW 325Ci 1999-2005 E46
BMW 325i 1992-1999 E36
BMW 325i 1999-2005 E46
BMW 325ic 1992-1999 E36
BMW 325is 1992-1999 E36
BMW 325xi 1999-2005 E46
BMW 328Ci 1999-2005 E46
BMW 328is 1992-1999 E36
BMW 328is 1999-2005 E46
BMW 330Ci 1999-2005 E46
BMW 330i 1999-2005 E46
BMW 330xi 1999-2005 E46
BMW M3 1995-1999 E36
BMW M3 1999-2005 E46
Instructions
Removal:
1. Unbolt shock absorber at trailing arm. Remove 2 bolts holding S-shape brake line to trailing arm
2. Mark forward trailing arm carrier bracket for later re-installation. Unbolt forward trailing arm carrier bracket from chassis and lower front of trailing arm to gain access to bushing.
3. Unbolt bracket from bushing and remove from trailing arm. Mark so that the new bushing can be inserted in the same orientation.
4. Install bushing tool on trailing arm. Set aside rectangular washer (this part will only be used when installing new bushing). Thread the threaded block over the threaded rod bored-out portion first (to fit over the metal portion of bushing).
5. Insert rod through bore of bushing and slip U-shaped part over rod. Slip one steel washer over threaded rod. Thread on short nut and snug assembly in place on trailing arm. Thread second, long nut and jam against first, tightening the two using a pair of wrenches.
NOTE: Be sure U-shaped block seats neatly against trailing arm and threaded block seats neatly against the bushing ONLY.
6. Begin tightening nut. If excessive force is required, be sure tool components are properly seated against their respective parts.
NOTE: use penetrating fluid to loosen corroded bushings and housings.
7. Continue tightening nuts to slowly pull bushing out of trailing arm. Once bushing is removed, clean surface of trailing arms bushing housing.
Installation:
1. Install bushing tool on subframe with U-shaped block seated against inner face of trailing arm.
2. Slip new bushing over threaded rod. Slip rectangular washer over threaded rod and seat against new bushing.
3. Thread threaded block down the rod until snug against rectangular washer.
4. Offset the marked bushing about 1/8” opposite the tightening direction. The reinstallation of the bushing will align itself.
5. Lubricate bushing with soapy water and begin tightening nut to draw bushing into housing. Be sure bushing is drawn in evenly.
6. Remove tool and re-install bushing carrier bracket (using the mark you made earlier), brake line and shock absorber.


